Docs & Software Download
Step-by-step overview of the MIFARE DESFire ® C console software example.
1. Software Overview
Link: /code/nfc-rfid-reader-sdk/ufr-ds-examples-c.git
When you launch the software, it appears as follows:
The Key for authentication, AID, AID Key number for authentication, File ID, and Internal Key Index are all retrieved from the config.txt file.
1.1. Config file explanation (config.txt)
The configuration file config.txt is loaded when the software starts up. It includes an Authentication Key, an ordinal number of Keys in the AID for authentication, a File ID, and an Internal Key Index (when the Key is stored in the reader).
File structure:
DES key: 0000000000000000
AID 3 bytes hex: 000000
AID key number for auth: 0
File ID: 1
Internal key number: 0
The first line specifies the key type and its hexadecimal value.
If the key type is DES (8 bytes) then 16 characters have to be entered (DES key: 0102030405060708)
If the key type is 2K3DES (16 bytes) then 32 characters have to be entered (2K3DES key: 01020304050607080910111213141516)
If the key type is 3K3DES (24 bytes) then 48 characters have to be entered (3K3DES key: 010203040506070809101112131415161718192021222324)
If the key type is AES (16 bytes) then 32 characters have to be entered (AES key: 01020304050607080910111213141516)
The second line contains AID, 6 characters have to be entered (AID 3 bytes hex: 010203)
The third line contains an ordinal number in the application for authentication (0 to the maximal number of application keys – 1)
The fourth line contains an index of the File ID in the application. If the function doesn’t use this parameter, then this value is ignored.
The fifth line contains an ordinal number of keys for authentication stored in the reader.
The configuration file can be changed from the application when ‘t’ is pressed (Change config parameters).
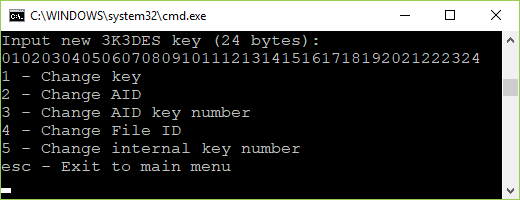
First, you will see the current config.txt file with options 1 – 5 for changing and ESC for back to the main menu.
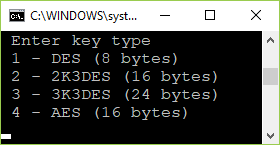
For key changing press ‘1’. There are four types of keys for authentication.
For example press ‘3’ for the 3K3DES key. Enter 24 bytes in hexadecimal format (48 characters).
When the change is over, press the ESC button for return in the main menu, and then press ‘t’ for modification checking.
The type and value of the authentication key have been changed.
1.2. Change authentication mode (0)
For switching between internal or provided key authentication, press ‘0’ on the keyboard.
It looks like this (here is ‘0’ pressed twice):
1.3. Master key authentication (1)
For switching between master key authentication, press ‘1’ on the keyboard.
It looks like this (here is ‘1’ pressed twice):
Whether authentication is required or not, depends on the master key of the card or application settings.
1.4. Get card UID (2)
For card UID (7 bytes) press ‘2’. Valid authentication with a master or application key is required.
1.5. Format card (3)
Pressing the number ‘3’ on your keyboard will cause formatting card (deleting all applications and files except AID with number: 000000).
Depending on which authentication mode you chose, it will look for the AES key in the reader (INTERNAL KEY) or in the config.txt file (PROVIDED KEY).
1.6. DES to AES (4)
Changing the card master key from factory DES key 0x0000000000000000 to AES key 0x00000000000000000000000000000000.
1.7. AES to DES (5)
Changing the card master key from AES key 0x00000000000000000000000000000000 to DES key 0x0000000000000000.
1.8. Get free memory (6)
Read the quantity of available memory on the card.
1.9. Set random ID (7)
Activating the random ID card options by Set Random ID button. Required authentication using a card master key.
The card returns 4 bytes random ID instead of 7 bytes unique ID.
Warning: this operation is irreversible.
When this option is activated, the UID can be read by a special command that requires authentication using a valid key.
1.10. Internal key lock (8)
You have to enter a password (8 characters long) to Lock Key enrollment. The factory password is “11111111”.
1.11. Internal key unlock (9)
To unlock the possibility to enroll keys into the reader, you must enter the same password to unlock keys that are entered to lock keys enrollment. The factory password is “11111111”
1.12. Set baud rate (a)
After activating the option ‘Set baud rate’ by pressing ‘a’ on the keyboard you will see multiple choices to choose from for transceiving and receiving baud rate. Just enter the number next to the option you want to choose.
1.13. Get baud rate (b)
Read the values of transmitting and receiving the baud rate of the reader.
1.14. Store key into the reader (c)
The first choice is the type of key.
For example, choose the 3K3DES key. Key 0x010203040506070809101112131415161718192021222324.
The internal key index is 0. For 3K3DES keys, two key fields in the reader will be occupied. In this case 0 and 1. The first free key index is 2. For other key types, just one key field will be used.
1.15. Change key (d)
Changing card master, application master, and user keys. When changing the master key, then maybe change the key type and value of the key. In the application, all keys are the same type, and key types don’t be changed.
For example, change the master key to 3K3DES type, and value 0x010203040506070809101112131415161718192021222324.
1.16. Change the key setting (e)
For changing key settings, carefully read available settings, and chose one. Take care about the setting you chose, some of them cannot be changeable anymore. If you are changing settings for AID 000000 – IT CAN’T BE FORMATTED.
1.17. Get key setting (f)
Read card master or application master key settings and a maximal number of application keys. For example, read card master key settings.
1.18. Make application (g)
For example, make an application with AES keys. AID = 0xA10000. Maximal key number 3.
1.19. Delete application (h)
Enter AID to delete.
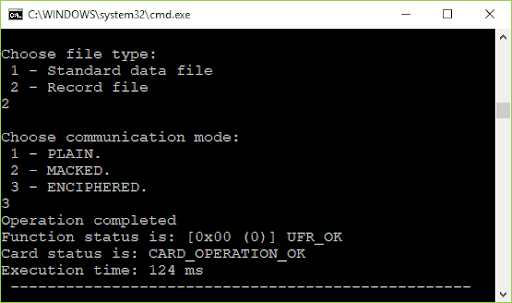
1.20. Make file (j)
In the configuration file set the AID and application master key.
For example make Standard Data File, size 100 bytes, enciphered communication.
Example: Make a value file. The lower limit is 0, the upper limit is 200, and the initial value is 100. Enciphered communication mode.
Example: Make a linear record file. The size of the record is 100, and the maximal number of records is 3, enciphered communication mode.
1.21. Delete file (k)
In the configuration file set the AID and application master key. Enter File ID for deleting.
1.22. Write Std file or Record (l)
In the configuration file set the AID, application key for Write or Read&Write access, and File ID.
For example write text to Standard data file, enciphered communication mode. The text is read from file write.txt. The size of the text must be less or equal to the size of the file.
Example: Write a record file.
1.23. Read Std file or Records (m)
In the configuration file set the AID, application master key, and File ID.
For example read data from Standard data files, enciphered communication mode. Read data will be saved into the read.txt file.
Example: Read two records.
1.24. Read value file (n)
In the configuration file set the authentication key, AID, AID key number for reading, and File ID.
1.25. Increase value file (o)
In the configuration file set the authentication key, AID, AID key number for Read&Write access, and File ID.
Example: Increase the value file by 20.
1.26. Decrease value file (p)
In the configuration file set the authentication key, AID, AID key number for reading, Write or Read&Write access, and File ID.
Example: Decrease the value file by 20.
1.27. Clear record file (r)
In the configuration file set the authentication key, AID, AID key number for Read&Write access, and File ID. All records in the Linear or Cyclic Record file will be deleted.
1.28. Get Application AIDs (s)
In the configuration file set the card master authentication key, AID = 0x000000.
Additional links:
To browse or download other software examples visit our Gitlab Software repository.
For purchasing our devices, visit our official online store.
Feel free to contact our technical support if you have any questions about our software examples.
Software download
Description
uFR Shell executable software enables command-line execution for µFR Series devices in console mode.


